RC-MON
Low Cost R/C Frequency
Monitor
Do
you suspect that external interference is causing your R/C model's glitches?
Wonder no more -- You can build your own frequency monitor and find out for
sure. Best of all, it is a low cost project that nearly anyone can assemble.
I did it at a cost of under $35!
|
 |
One of my
R/C airplanes was getting random glitches when I flew at my favorite
nearby park. I wasn't sure if it was due to a receiver problem, or if I was
a victim of external interference. Finally, after a fatal interference induced
crash, it was time to find out why.
I have a portable frequency
counter, but these are useless for this task. I wanted something with audio
so I could listen to the RF background noise and check for coherent
sounds that would indicate interference. But rather than spend $150 for a
handheld VHF ham radio scanner, I decided my needs did not warrant the expense.
So, it was time to warm up the soldering iron and build my own.
The task is really
not that difficult. All I needed was a cheap R/C Rx (receiver) and an audio
amplifier. It turns out that an entry level "park flyer" Rx is the best choice
for the job. These tend to have poor selectivity, which makes it easier to
spot RF interference. Used ones are often for sale by modelers that have
upgraded to something better.
The result of my efforts
is RC-Mon, a very low cost R/C frequency monitor and interference
finder that I built from readily available parts. You can build one
too.
Hunting and Gathering
My first thought was
to order one of those dirt-cheap GWS 4-channel Rx's. Instead, I found a used
Hitec Feather 4-channel Rx that was only $18. Luckily I had a compatible
Hitec crystal for my R/C frequency, so that saved me the expense of buying
one that matched my transmitter.
The details shown in
this project are specific to the Hitec Feather Rx, since that is what I had.
But you can use the basic details to hack nearly any retired R/C Rx for use
as an interference monitor. The Rx choice just needs to be on your R/C channel.
Let's begin by gathering the parts.
 |
You will need the
following (see photo on the left):
-
Radio Shack Mini Amplifier, part number 277-1008.
$12.95 USD.
-
Hitec Feather Rx with compatible crystal. The Rx can be
JR or Futaba "shift."
-
4-cell (4.8VDC) Rx
battery. An old retired pack will do just fine.
-
Female servo
connector.
-
36" long music wire
for antenna (not shown).
-
2.5" long brass tube,
slightly larger diameter than the music wire.
|
Wired for Sound
| Start by removing
the shrink wrap from the Feather Rx. On the bottom of the board you will
find a sixteen pin IC labeled
MC3361. This is the
FM demodulator IC. Pin-9 is the audio output, which is where we will connect
our amplifier. There are only three required wires: audio, power, and
ground.
Please refer to the
photo on the right (click it for larger view). Using small gauge wire, solder
three wires as shown (AUDIO, PWR-, PWR+). The lengths should be about
eight inches long. Strain relieve the three wires by wrapping them once around
the big cap on the component side. |
 |
| Option (not
shown in photos): For better volume level control, you can install an attenuator
on the audio signal. Refer to the schematic on the right. R1 is 22K and R2
is 1.8K ohms. Note: this circuit is not required but offers more pleasant
volume levels. |
 |
 |
The Feather Rx
is connected to the Radio Shack Mini-Amp as shown in the photo on the left.
Just remove the circuit board from the amplifier to gain access to the solder
pads for the AUDIO, PWR+, and PWR- wires. Solder them
in place.
Now permanently remove
the existing 9V battery connector. We cannot use it since the R/C Rx would
be destroyed if it was powered from such a high voltage.
Instead, we will use
a 4.8VDC to 6.0VDC battery pack to power RC-Mon. I wanted to use an old 4-cell
R/C battery I had, so I soldered a female servo/battery cable to the
BAT+ and BAT- pads. Now it can mate up to the battery
pack.
|
| The Mini-Amp's
Input jack is a shorting type, so we must modify it. Take a wood toothpick
and slide it into the Input jack and force the shorting contacts to open.
Note: Do NOT do this to the Ext Speaker jack.
Once the contacts are
forced open you can trim the toothpick so that it is flush with the outside
of the jack. Place a small amount of adhesive to hold it in place.
WARNING: DO NOT
SKIP THIS STEP. FAILURE TO INSTALL THE TOOTHPICK
WILL DAMAGE THE RECEIVER. |
 |
| All that remains
is to add a sturdy whip antenna. Begin by drilling a hole in the back cover,
as shown in the photo on the right. Using epoxy or CA adhesive, glue the
2.5" long brass tubing in place.
 |

Note: Before mounting
the tubing, slightly pinch it to help retain the 36" long music wire that
will be used as the whip antenna. Please see photo on the left. |
| Cut the Feather's
existing wire antenna to five inches long. Solder the end of it to the base
of the brass tubing. See photo on the right.
By the way, the Feather
Rx fits nicely in the old 9V battery bay. In case it matters, changing crystals
is an easy affair. |
 |
 |
Protect your
eyes! As a safety precaution, the tip of the 36" long music wire antenna
is fitted with a craft store bead. A drop of adhesive holds it in place.
As an alternative, you can also bend the end into a loop. This little detail
will help prevent serious eye injuries. See photo on the left.
When it is time to
use RC-Mon, the whip antenna is merely stuffed into the brass tubing. The
pinched region should hold it snug, but still allow removal for convenient
storage. |
| Check over your
work and ensure that no assembly mistakes have been made. Then carefully
lay the Feather Rx into the old 9V battery bay and re-assemble the mini-amp.
Using some velcro strips,
mount the 4-cell battery on the back of the case. Please see the photo on
the right.
What is nice about
the big external pack is that charging is very easy and the extra mass helps
keep the monitor upright when it is used on a table top. |
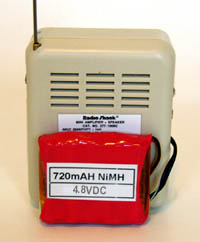 |
What's that Noise?
Now that everything
is assembled, it's time to plug in the 4.8V battery. Adjust the volume to
something comfortable. At this point you should hear white noise. It sounds
like rainfall or a running shower. Click for
audio demo of white noise.
White noise is ideal.
This is an indication that there is no interference. Any clicks, pops,
or coherent noise, is a symptom of interference of some sort.
You can also check
to see if your frequency is clear of other R/C transmitters. A constant buzzing
sound is a good indication that another transmitter is in use. The range
of the RC-Mon is nearly a mile in unobstructed areas, so it is very effective
for this. Click for audio demo of PPM R/C
transmitter.
You can determine the
strength of the interference by removing the whip antenna and rechecking
the noise level. Just walk around and follow the path to the loudest
interference.
By the way, if you
run into a situation where the monitor is silent, or nearly so, then that
can be an indication of a strong RF carrier that just happens to not be
modulated. That will still interfere with your model, so be cautious. Frankly,
sometimes silence is not golden.
The Small Print:
All information is
provided as-is. I do not offer any warranty on its suitability. That means
that if you build and use this device, you will do so at your own risk. |